
The latest version of OFFLOOP is here
User Guide
OFFLOOP Sequencer Studio
MIDI Studio — Quick Start Guide & Handbook
Stringer Audio 2026 · Version B65
1. Overview — How It All Fits Together
OFFLOOP is a standalone MIDI sequencer. It doesn’t make sound on its own — it sends MIDI note data to hardware synthesisers, drum machines, or software instruments running in a DAW.
The Signal Flow
Think of OFFLOOP as a chain of three layers, each influencing the next:
OFFLOOP Sequencer Studio vB65 — Stringer Audio 2026
For the latest updates visit your Stringer Audio account.
Quickstart Guide (old)
New version B65 runs in an app now, no more need for chrome. Mac or PC –
The latest version of OFFLOOP is here
ver B56 version Feb 2026
midi note recording and note learn.
drums
lots of new additions.
download here
previous versions –
Ver B50 4th August 2025
*Note Length (click with shift and drag or shift click on empty step)
*Multiclick steps (click and drag)
*Chords
*Tabbed Views (shift to add multiple)
*Channel mute in song layout
*Pure and Mystic key modes (these were original modes, now has normal scaling too)
*Delays send to Midi (with assignable ch number)
*Channel Mute and Solo
*Mix Page (work in progress)
*Performance page (work in progress)
*Unusual loop lengths and delay times (+loooong)
**Also added loop start point for more synchronised loops
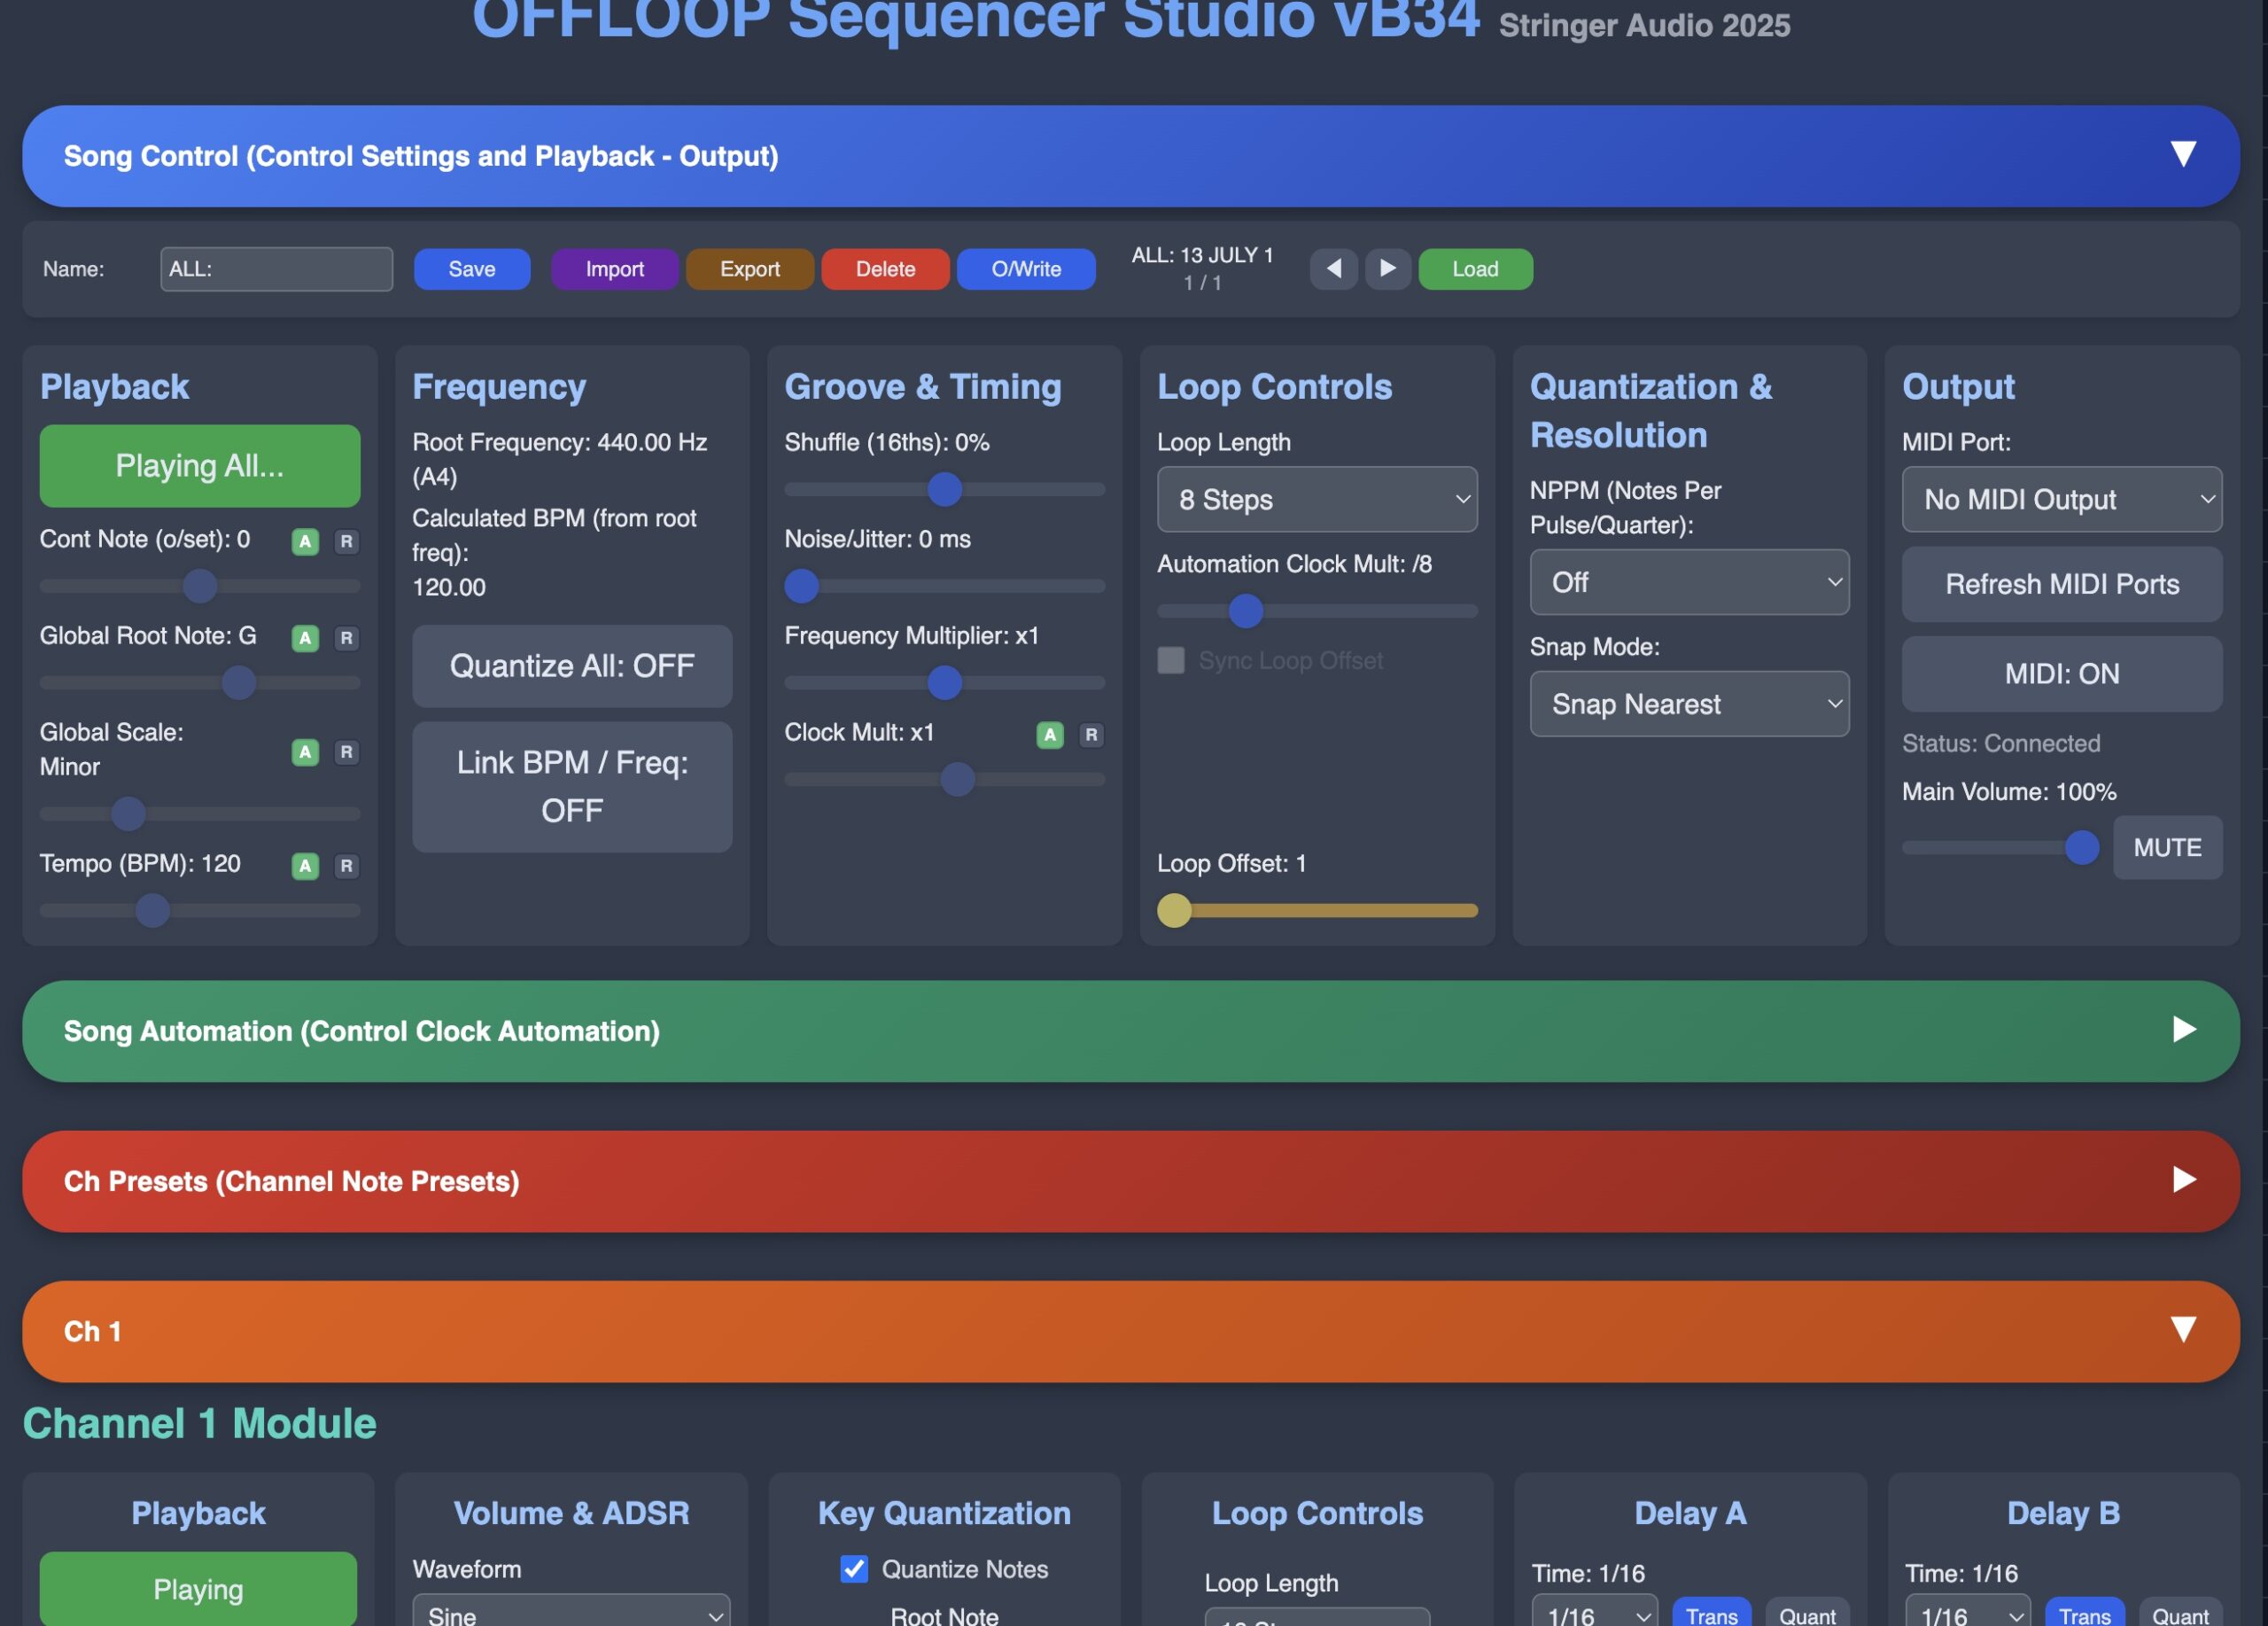
QUICKSTART GUIDE
Start the sequencer by pressing the Green Start All Button (top left.)
Scroll down past the Control Clock Automation (this is the Song control section) to the Channels section. Find Channel 1 and click on the big yellow Randomise All button – you should hear music. Randomise All fills all the rows of 1 channel, these rows are : Step on/off, Note number/transpose, Octave number, Velocity and Chord.
You can sculpt the octaves down a bit if it sounds too trebly by pressing the -1 next to the OCT row. Step button controls are : all On, all Off, 4/4, shift left < and shift right >. (The shift only moves the step on buttons not the other lanes.) And perhaps turn off the chord madness with the 0 next to the chord row.
Try moving the yellow fader in the middle above the fader rows called Loop Offset to hear different areas of the loop. See the A and R buttons next to the fader? The A is Automation control, the R is Record. If you press the R it will record the fader movements into the top song area in a default 4 bar loop. Press R to stop recording and the Automation will take over.
Now scroll back up to the top and look at the Playback box top left. These settings affect all 4 channels by default. The A’s are all highlighted in green so if you try and move the fader it won’t work. Disable the automation for that parameter by clicking the A and now the fader will work.
The faders are :
Cont Note (or Transpose)
Global Root note
Global Scale
Tempo
Pressing the A’s here will record automation into the sequencer rows below enabling complex key layouts that can then be tidied up manually.
To the right of the fader rows are 2 columns of buttons, these are for quick editing of the faders. S-1 and S+1 modify only the selected loop area, the other buttons affect all 32 steps.
Scales:
CR – Chromatic
M – Major
m – Minor
PM – Pentatonic Major
Pm – Pentatonic Minor
B – Blues
G – Raga G
Hm – Harmonic Minor
Mm – Melodic Minor
S-M (Selected Loop) to Major
S-m (Selected Loop) to Minor
Next go back down to the channels and randomise channel 2, now you have 2 channels playing together in key. Can you see the Delay A and Delay B panels? The delays are not working because the inputs are on zero. Increase the input to 100 and bring the feedback up to about 60. The delay can now be heard. Try changing the time to 1/8 or 1/4. Nice. The filter on the right limits notes higher or lower from being played by the delay by changing them to these notes, this is especially useful when you start pitch shifting the delays, the feedback can get quite out of hand. Remember these delays are on the midi notes, not the audio.
Going back to the top now there’s a LINK BPM / Freq on/off button in the Frequency Box. This links the pitch of the sequencer to the tempo which sounds like playing a sample up and down a keyboard and can be heard by changing the tempo using the fader. Groove & Timing:
Shuffle is shuffle, + and – on a slider.
Noise/Jitter brings in timing inaccuracies.
Frequency Multiplier is a global octave up/down setting.
Clock Mult divides or multiplies the clocks for Channel 1-4 (and can be recorded and automated)
Loop Controls : Loop Length is the length of the control automation loop, Automation Clock Mult is the speed of the automation loop, remember this won’t affect the speed of Channels 1-4, but does control how long each fader lasts in the automation. The Loop Offset fader for the Control is great for writing different sections of the song, using the S-1 and S+1 buttons to sculpt and you can loop different sections of the control.
Next box is Quantization & Resolution. 24, 48, 96 notes per pulse/quarter, this emulates the gritty timing characteristics of early sequencers with an added snap mode for how the quantisation is done. This is subtle but interesting, especially when you get a lot going with the sequencers.
Last box is Output. Set Midi Port. When you first run the sequencer it will ask permission to access the Midi ports, just click yes. Delays also send out Midi on assignable channels. I’ve not fully tested the Midi yet. OffLoop is still very rough around the edges but it is only a couple of months old and I’m amazed it works at all and in a browser too. Enjoy!!
Chords:
RT – Root
m2 – Minor interval
M2 – Major interval
P5 – Perfect 5th
m7 – Minor 7th interval
M7 – Major 7th interval
mT – Minor Triad
MT – Major Triad
dT – Diminished triad
aT – Augmented triad
s2 – Suspended 2nd
s4 – Suspended 4th
PC – Power Chord
Mj – Major 7th
mj – Minor 7th
D7 – Dominant 7th
M9 – Major 9th
m9 – Minor 9th
D9 – Dominant 9th
m11 – Minor 11th
D11 – Dominant 11th
M13 – Major 13th
m13 – Minor 13th
D13 – Dominant 13th
h7 – Half-diminished 7th
d7 – Diminished 7th
mm – Mm (Minor-major 7th)
a7 – Augmented 7th
Ly – Lydian chord
Ph – Phrygian chord
Q4 – Quartal chord
WT – Whole tone cluster
(But remember these chords will be altered by the key correction and transposition)
Also save an Automation preset and a Channel Note preset with the same name, just a different prefix. Once you have some presets saved you can mix and match them which is great for trying out different chord structures.